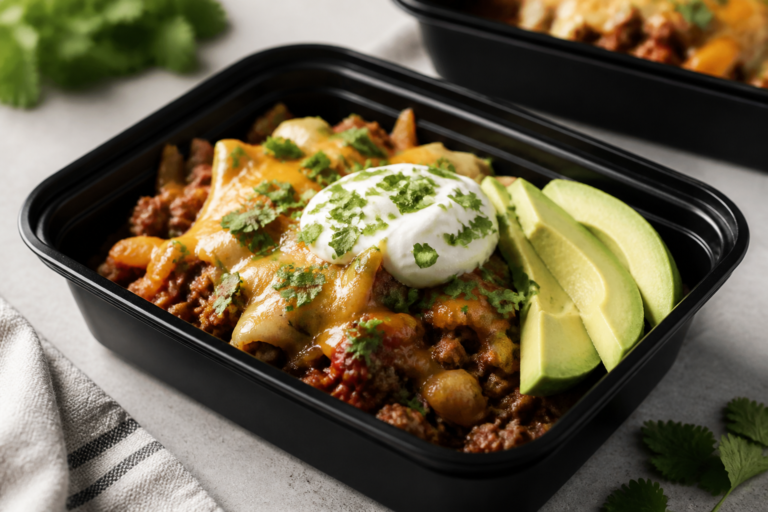
Low Carb Cheeseburger Skillet Meal Prep – Fast, Flavorful, and Satisfying
This low carb cheeseburger skillet meal prep brings everything you love about a juicy burger into one easy pan—no bun required. It’s rich, savory, and packed with classic cheeseburger flavor, but it keeps carbs in check so you feel energized instead of sluggish. The best part is how quickly it comes together on a busy weeknight.
Make a big batch once, portion it out, and you’ve got satisfying lunches or dinners ready to go. It’s simple cooking that tastes like comfort food.
Ingredients
Method
- Prep your ingredients: Dice the onion and bell pepper, mince the garlic, drain the tomatoes, and chop the pickles. Measure seasonings so they’re ready to go.
- Brown the beef: Heat a large skillet over medium-high. Add oil if your beef is very lean. Crumble in the beef and cook until browned, 6–8 minutes. Season lightly with salt and pepper.
- Render and drain: If there’s excess fat, drain most of it, leaving about a tablespoon for flavor. This prevents a greasy skillet later.
- Sauté aromatics: Add onion and bell pepper. Cook 3–4 minutes until softened. Stir in garlic and cook 30 seconds, just until fragrant.
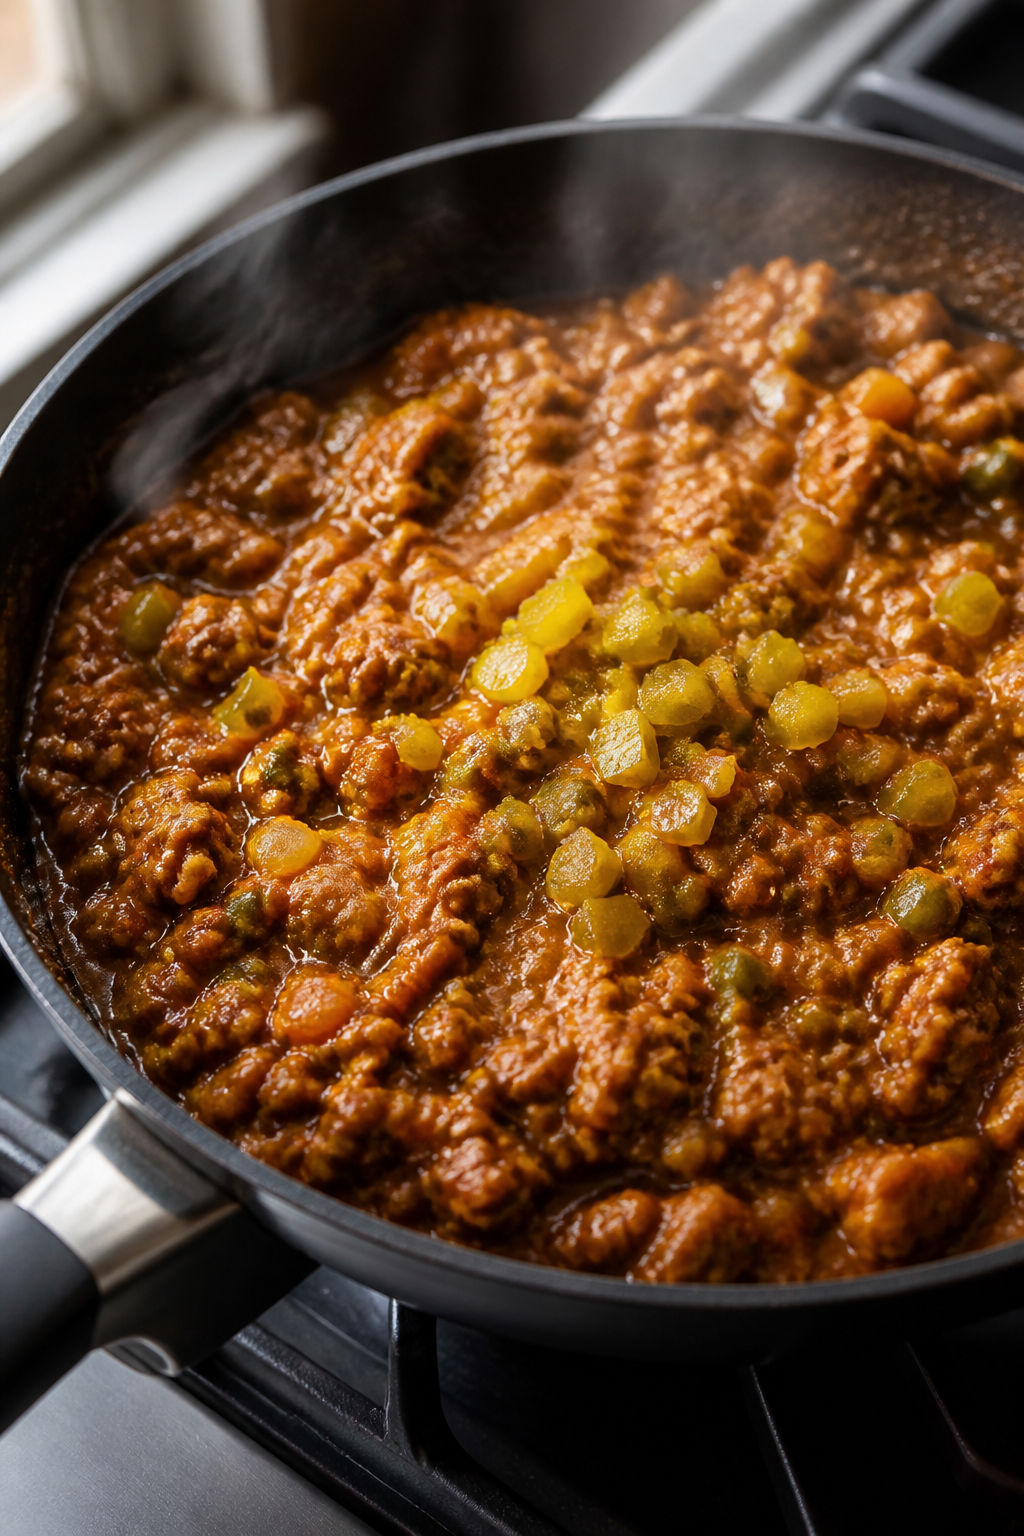
- Build the cheeseburger base: Add tomato paste, ketchup, mustard, Worcestershire, smoked paprika, onion powder, and garlic powder. Stir to coat the meat and veggies.
- Add tomatoes and pickles: Mix in the drained diced tomatoes and chopped pickles. Pour in beef broth. Stir and bring to a gentle simmer.
- Simmer and reduce: Let it bubble on medium-low for 5–7 minutes. You want it thick and saucy, not soupy. Taste and adjust salt and pepper.
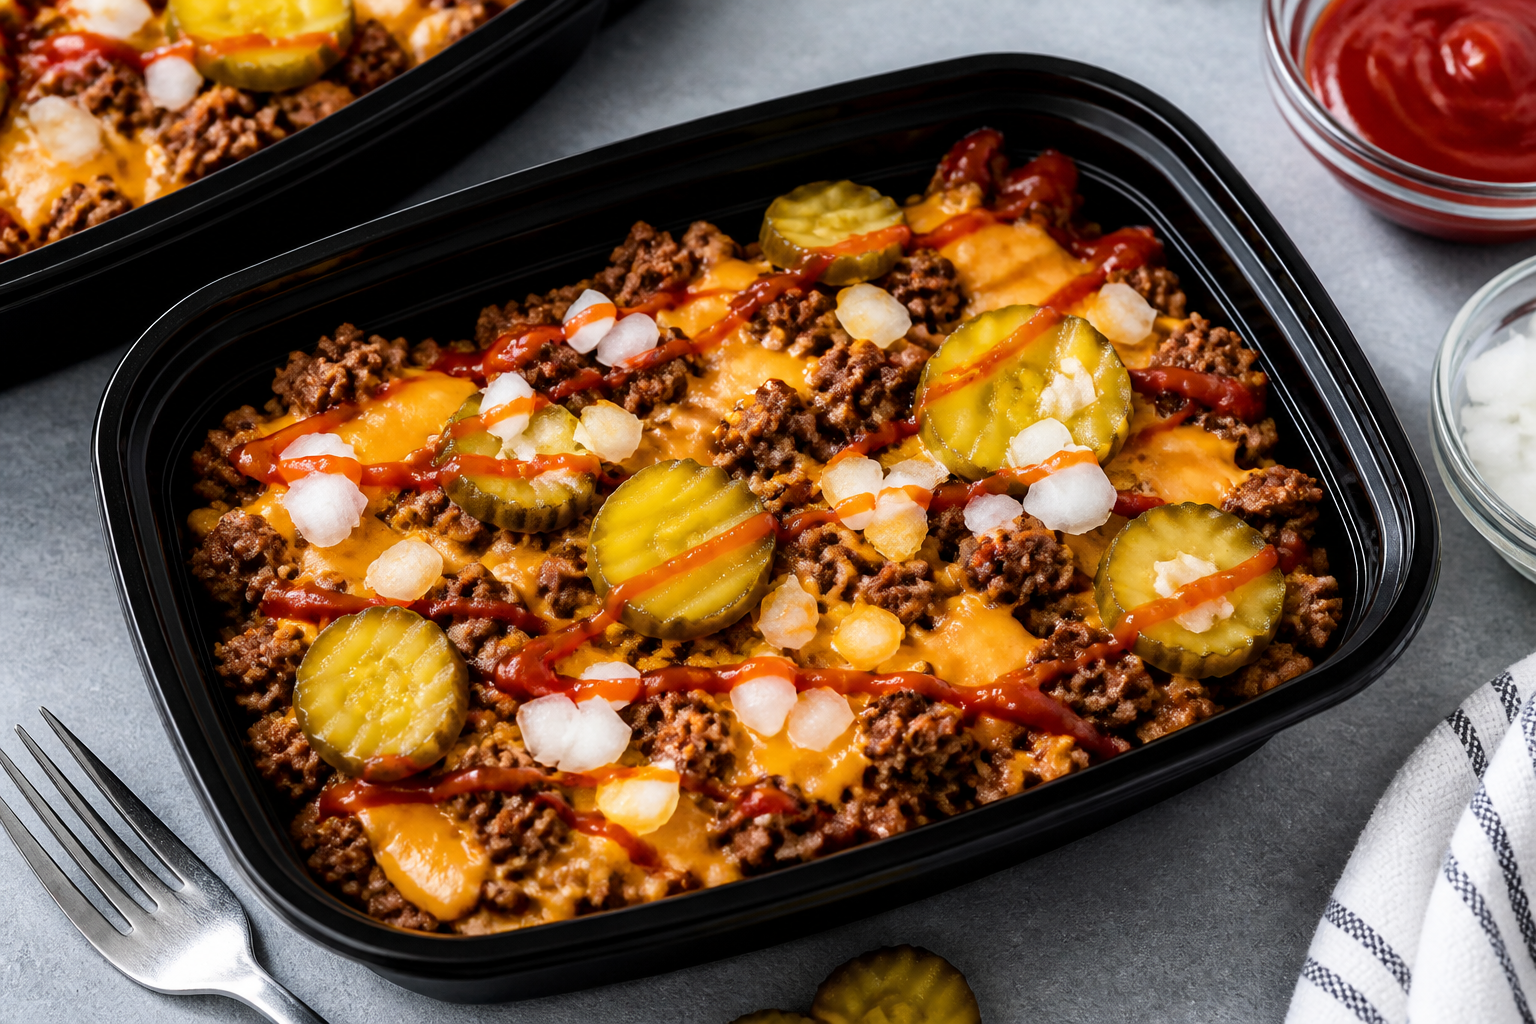
- Cheese it up: Sprinkle shredded cheddar evenly over the skillet. Cover and let it melt for 1–2 minutes. For browned spots, briefly broil in an oven-safe skillet, watching closely.
- Cook the cauliflower rice: In a separate pan, melt butter over medium heat. Add riced cauliflower with a pinch of salt and pepper. Sauté 4–5 minutes until tender but not mushy. Remove from heat.
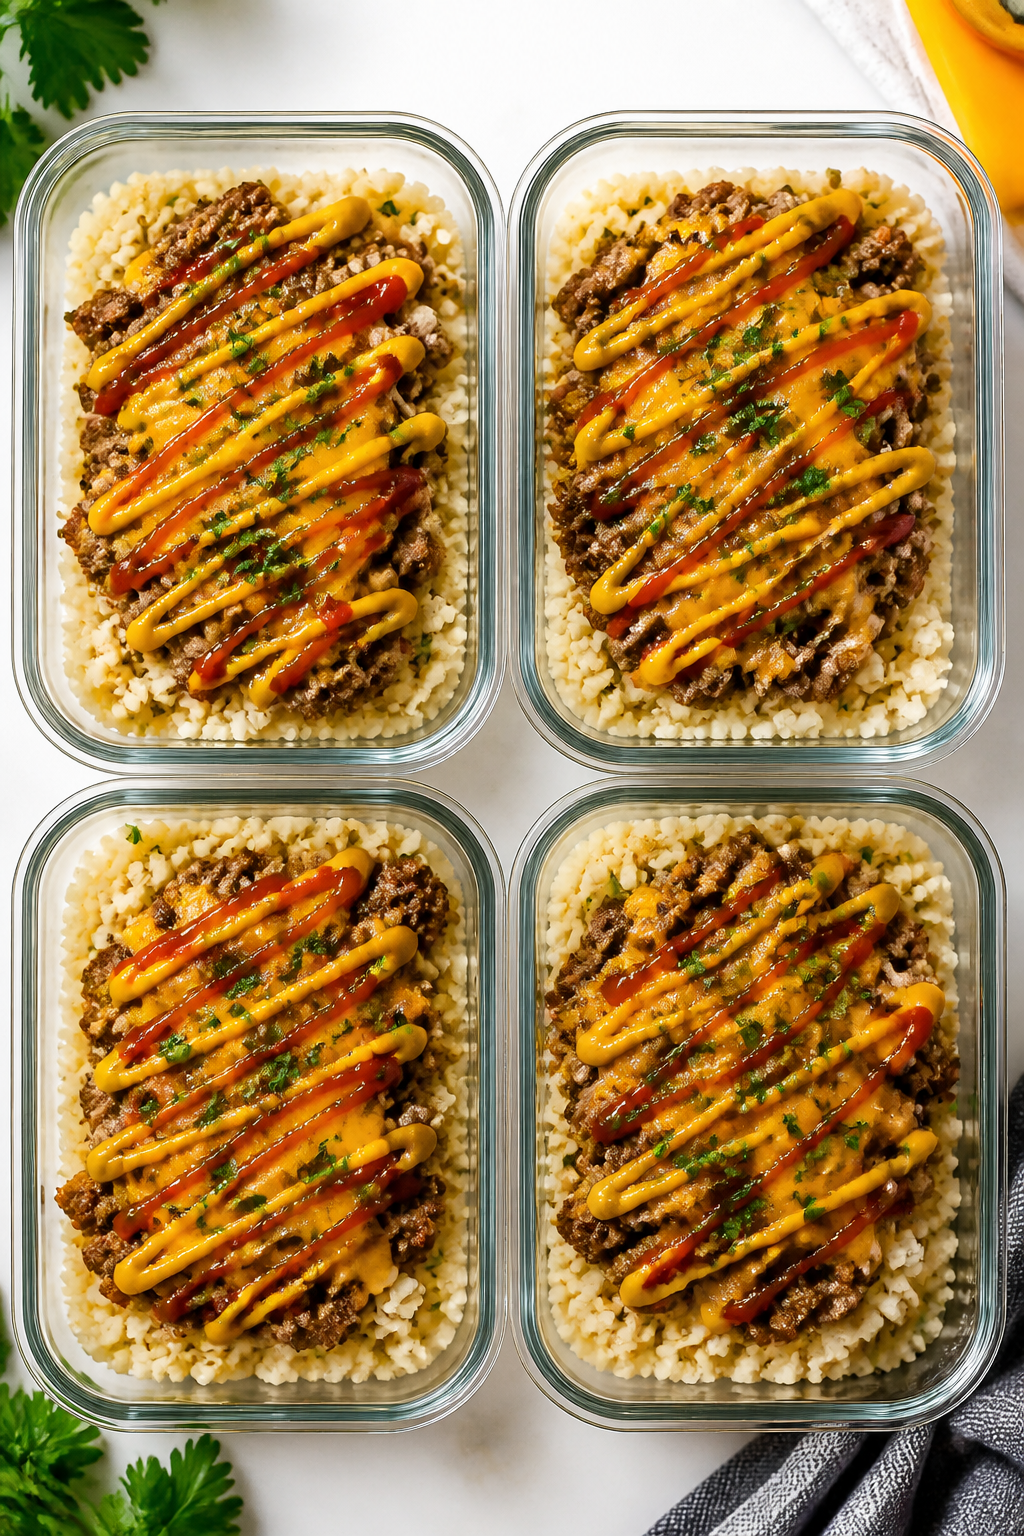
- Assemble for meal prep: Divide cauliflower rice among 4–5 airtight containers. Spoon the cheeseburger mixture on top. Garnish with parsley if using.
Why This Recipe Works
- One-pan convenience: Minimal dishes and minimal fuss. Brown, season, simmer, and you’re done.
- Balanced and filling: Protein from ground beef and cheese keeps you full; veggies add fiber and micronutrients.
- Low carb, high flavor: A tangy, creamy sauce channels classic burger vibes without the bun or sugary condiments.
- Meal-prep friendly: Holds up well in the fridge for several days and reheats without getting mushy.
- Customizable: Swap proteins, cheeses, or veggies to fit your tastes and macros.
Ingredients
- 1.5 pounds (680 g) ground beef (80–90% lean works well)
- 1 tablespoon olive oil or avocado oil (if needed)
- 1 small yellow onion, diced
- 2 cloves garlic, minced
- 1 medium green bell pepper, diced
- 1 cup chopped dill pickles (drained well)
- 1 (14.5 oz) can diced tomatoes, drained
- 2 tablespoons tomato paste
- 1 tablespoon yellow mustard (or Dijon)
- 2 tablespoons sugar-free ketchup (or low-sugar ketchup)
- 1 teaspoon Worcestershire sauce (optional)
- 1 teaspoon smoked paprika
- 1 teaspoon onion powder
- 1/2 teaspoon garlic powder
- Salt and black pepper, to taste
- 1/4 cup beef broth (or water)
- 6 ounces shredded cheddar cheese (about 1.5 cups)
- 4 cups riced cauliflower (fresh or frozen)
- 1 tablespoon butter (for the cauliflower rice)
- 2 tablespoons chopped fresh parsley (optional, for garnish)
Step-by-Step Instructions

- Prep your ingredients: Dice the onion and bell pepper, mince the garlic, drain the tomatoes, and chop the pickles.
Measure seasonings so they’re ready to go.
- Brown the beef: Heat a large skillet over medium-high. Add oil if your beef is very lean. Crumble in the beef and cook until browned, 6–8 minutes.
Season lightly with salt and pepper.
- Render and drain: If there’s excess fat, drain most of it, leaving about a tablespoon for flavor. This prevents a greasy skillet later.
- Sauté aromatics: Add onion and bell pepper. Cook 3–4 minutes until softened.
Stir in garlic and cook 30 seconds, just until fragrant.
- Build the cheeseburger base: Add tomato paste, ketchup, mustard, Worcestershire, smoked paprika, onion powder, and garlic powder. Stir to coat the meat and veggies.
- Add tomatoes and pickles: Mix in the drained diced tomatoes and chopped pickles. Pour in beef broth.
Stir and bring to a gentle simmer.
- Simmer and reduce: Let it bubble on medium-low for 5–7 minutes. You want it thick and saucy, not soupy. Taste and adjust salt and pepper.
- Cheese it up: Sprinkle shredded cheddar evenly over the skillet.
Cover and let it melt for 1–2 minutes. For browned spots, briefly broil in an oven-safe skillet, watching closely.
- Cook the cauliflower rice: In a separate pan, melt butter over medium heat. Add riced cauliflower with a pinch of salt and pepper.
Sauté 4–5 minutes until tender but not mushy. Remove from heat.
- Assemble for meal prep: Divide cauliflower rice among 4–5 airtight containers. Spoon the cheeseburger mixture on top.
Garnish with parsley if using.
How to Store
- Refrigerator: Store in airtight containers for up to 4 days. Let it cool for 15–20 minutes before sealing to reduce condensation.
- Freezer: Freeze portions for up to 2 months. For best texture, freeze the cheeseburger mixture and cauliflower rice separately.
- Reheating: Microwave 1.5–3 minutes, stirring halfway, until hot.
On the stovetop, reheat over medium with a splash of broth if needed. Add a sprinkle of cheese after reheating to refresh the “cheeseburger” effect.
Health Benefits
- Lower carbs, steady energy: Skipping the bun and using cauliflower rice helps avoid blood sugar spikes and afternoon crashes.
- High protein: Ground beef and cheese provide protein to support muscle recovery and satiety.
- Micronutrients from veggies: Peppers, onions, tomatoes, and cauliflower add fiber, vitamin C, potassium, and antioxidants.
- Customizable fat level: Choose leaner beef or reduce cheese to fit your calorie goals, or add avocado for heart-healthy fats.
What Not to Do
- Don’t skip draining excess fat: Too much grease will make the dish heavy and can muddy the flavors.
- Don’t add pickles too early with high heat: They can turn soft and lose their tang. Add them before simmering but after lowering the heat.
- Don’t overcook the cauliflower rice: Mushy cauliflower ruins the texture contrast.
Keep it slightly firm.
- Don’t use sugary condiments: Regular ketchup or sweet relish can spike carbs fast. Stick with sugar-free or low-sugar options.
- Don’t drown it in liquid: The sauce should cling to the meat. If watery, simmer longer uncovered.
Alternatives
- Protein swaps: Use ground turkey, chicken, or bison.
If using extra-lean meat, add 1 tablespoon olive oil for better browning and flavor.
- Cheese options: Try pepper jack for heat, Swiss for a patty-melt vibe, or a blend of cheddar and mozzarella for extra gooeyness.
- Veggie boosts: Add mushrooms, zucchini, or spinach. Sauté moisture-heavy veggies first so the skillet doesn’t get watery.
- Sauce twist: Stir in 2 tablespoons cream cheese for an ultra-creamy version, or a dash of hot sauce for kick.
- Different bases: Serve over sautéed cabbage, spiralized zucchini, or a simple side salad with ranch for a low-carb “burger bowl.”
- Dairy-free: Skip cheese and finish with a drizzle of dairy-free “cheese” sauce or a spoon of guacamole for richness.
FAQ
Can I make this ahead and keep it from getting soggy?
Loved This Recipe?
If you're looking for more simple, healthy keto dinners, grab my FREE 7-Day Easy Keto Dinner Reset. You'll get 7 easy keto dinner recipes, simple grocery lists, and a done-for-you plan that takes the stress out of mealtime.
Yes. Let the skillet mixture cool slightly before packing, and keep the cauliflower rice separate if you’re picky about texture.
Reheat them together just before eating.
Is this recipe keto-friendly?
It can be. Use sugar-free ketchup, avoid high-carb add-ins, and portion the tomatoes and onions modestly. Adjust cheese and fat to fit your macros.
What if I don’t like pickles?
Leave them out, or swap with a small splash of pickle juice or apple cider vinegar to keep a bright, tangy note.
You can also add chopped green olives for a different twist.
How can I reduce the calories?
Use 93–96% lean beef, reduce cheese to 4 ounces, and cook the cauliflower rice with cooking spray instead of butter. Flavor will still be great thanks to the spices.
Can I use frozen cauliflower rice?
Absolutely. Sauté straight from frozen over medium heat to evaporate excess moisture.
Season at the end and avoid overcooking.
What’s the best way to reheat without drying it out?
Add a tablespoon of broth or water, cover, and heat gently. Stir halfway and top with a little fresh cheese or a dollop of ketchup and mustard after reheating.
Does this work for kids?
Often yes. If your kids are sensitive to pickles or onions, chop them very small or reduce the amount.
Use a mild cheddar and skip the smoked paprika if needed.
Can I add bacon?
Definitely. Cook 3–4 slices until crisp, crumble, and fold in at the end. Bacon adds crunch and classic bacon-cheeseburger flavor.
In Conclusion
This Low Carb Cheeseburger Skillet Meal Prep delivers all the comfort of a cheeseburger in a simple, one-pan package that fits your goals.
It’s fast, flexible, and perfect for batch cooking. With bold flavor, easy ingredients, and a make-ahead format, it’s a weeknight and lunch-box win. Make it once and enjoy stress-free, satisfying meals all week long.
Printable Recipe Card
Want just the essential recipe details without scrolling through the article? Get our printable recipe card with just the ingredients and instructions.
Need More Easy Keto Dinner Ideas?
Get my FREE 7-Day Easy Keto Dinner Reset and enjoy a full week of healthy dinners without the meal-planning stress.