Loaded Bacon Cheeseburger Bites – A Fun, Crowd-Pleasing Snack
These Loaded Bacon Cheeseburger Bites bring all the flavor of a classic burger into a fun, bite-sized form. They’re perfect for game days, parties, or a simple weeknight treat. Crispy on the outside, juicy in the middle, and topped with all the fixings, they disappear fast.
You can prep them ahead, bake them quickly, and serve them hot with your favorite dipping sauces. If you love a good cheeseburger, this is the snack you’ll keep making on repeat.
Ingredients
Method
- Preheat your oven to 400°F (200°C). Line a baking sheet with parchment or foil and lightly spray with oil. This helps the bites crisp and release easily.
- Cook the bacon until crisp. Drain on paper towels and chop it finely. Set aside. You want small pieces so they mix evenly and don’t cause the bites to fall apart.
- In a large bowl, combine the ground beef, chopped bacon, shredded cheese, diced onion, relish, egg, and breadcrumbs.
- Add the mustard, ketchup, Worcestershire sauce, salt, pepper, garlic powder, onion powder, and smoked paprika. Mix gently with your hands or a fork. Don’t overwork it—just until everything is evenly combined.
- Use a tablespoon or small scoop to portion the mixture into bite-sized balls, about 1 to 1.5 inches in diameter. You should get roughly 24 bites.
- Arrange the bites on the prepared baking sheet with a little space between each. If you like extra browning, lightly brush or dab the tops with a thin layer of mayonnaise.
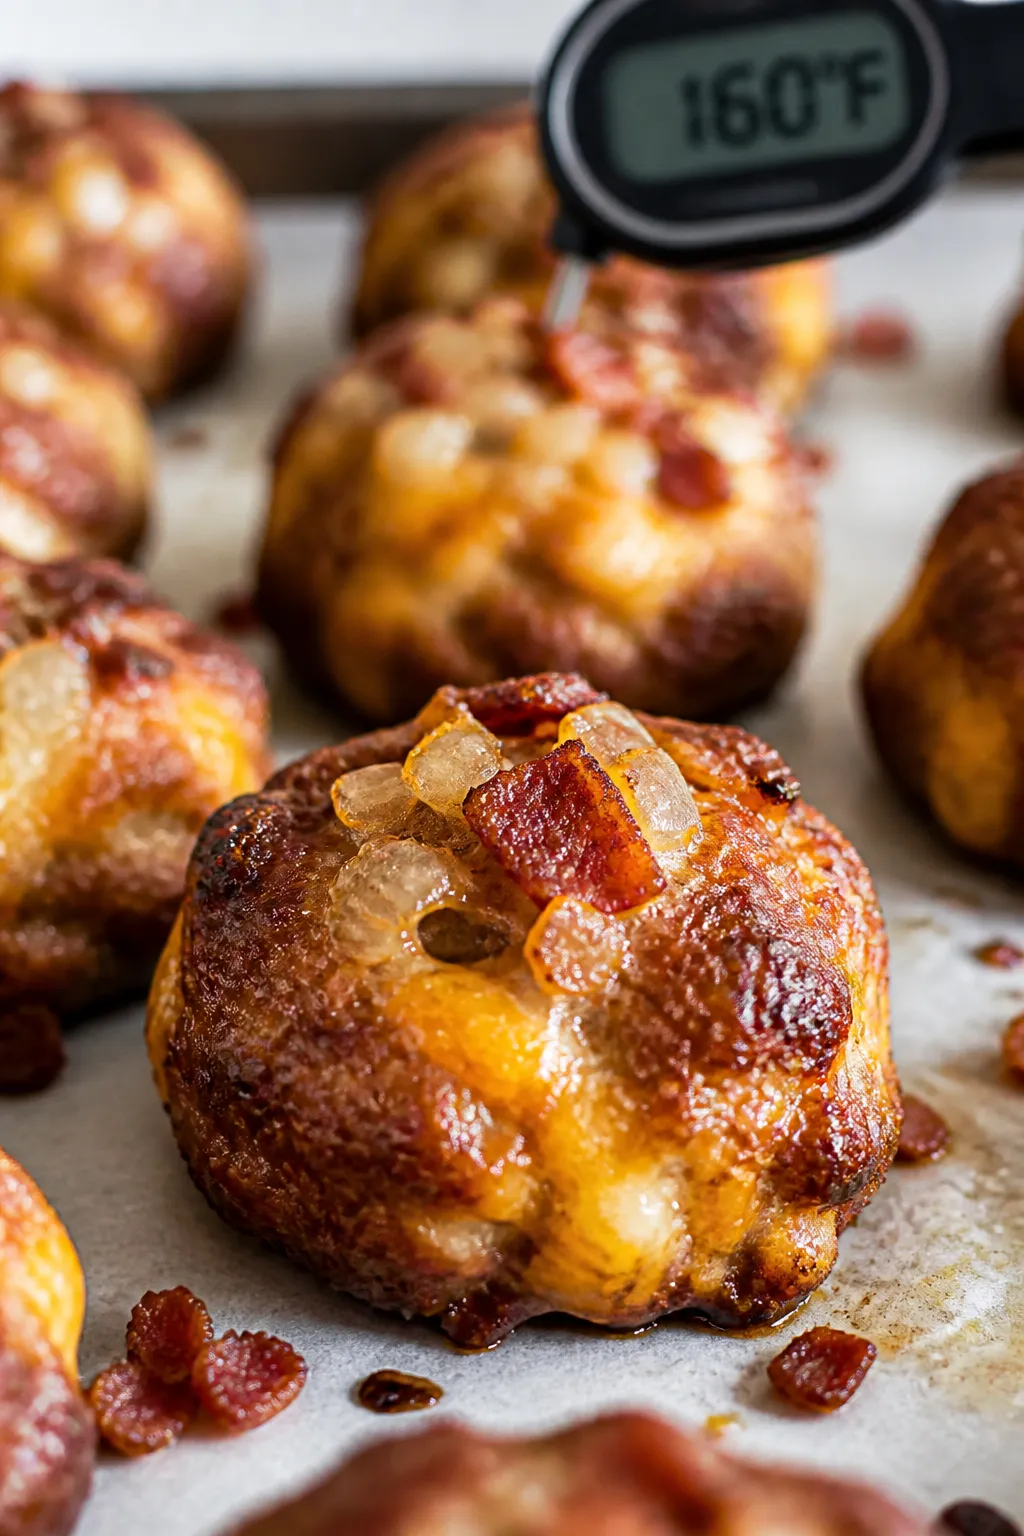
- Bake for 12–15 minutes, or until the centers reach 160°F (71°C) and the edges are nicely browned. If you want more color, broil for 1–2 minutes at the end.
- Let them rest for 3–4 minutes. This helps the juices settle and the cheese set slightly.
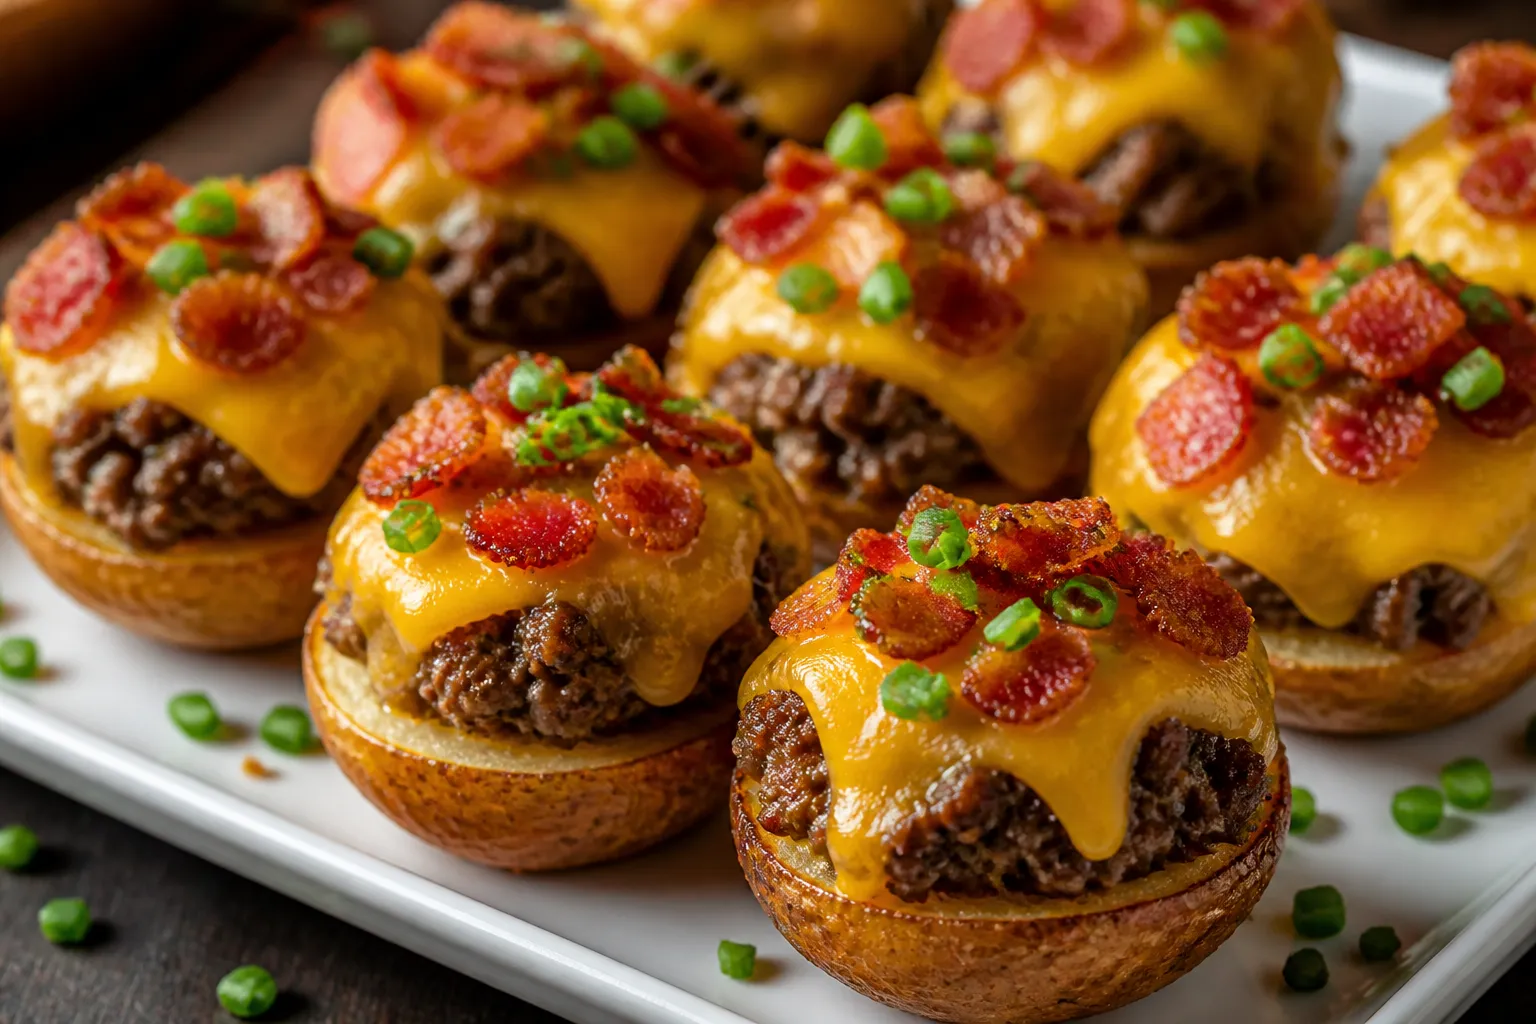
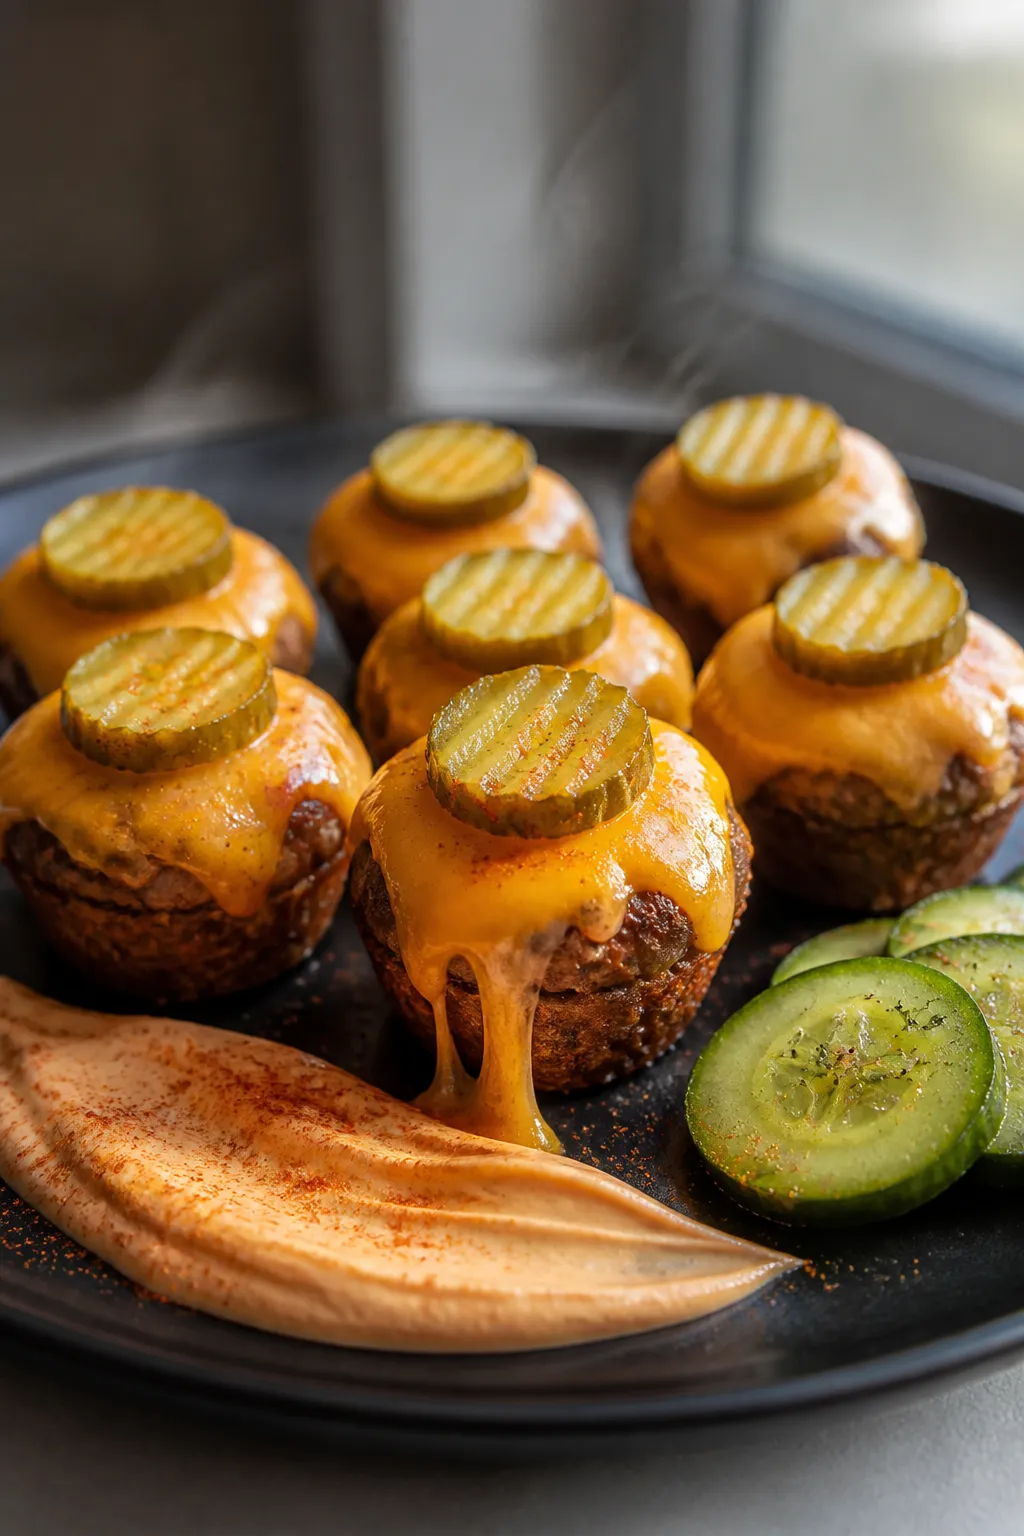
- Serve warm with your favorite toppings and dips. Good options include a quick “special sauce” (equal parts mayo and ketchup with a splash of pickle juice), mustard, BBQ sauce, or ranch.

What Makes This Recipe So Good
- Big flavor, small size: Each bite packs seasoned beef, gooey cheese, and smoky bacon in one crisp, juicy mouthful.
- Party-ready: Easy to assemble, easy to share, and they hold well on a platter without getting soggy.
- Versatile toppings: Dress them up with pickles, special sauce, green onions, or jalapeños—whatever you love on a burger.
- Kid- and adult-approved: Familiar flavors with a fun twist. No forks needed.
- Make-ahead friendly: Form the bites in advance and bake right before serving.
Ingredients
- 1 pound (450 g) ground beef, 80/20 for best juiciness
- 6 slices thick-cut bacon, cooked crisp and finely chopped
- 1 cup shredded cheddar or Colby Jack cheese
- 1/3 cup finely diced onion
- 2 tablespoons dill pickle relish (or finely chopped dill pickles)
- 1 large egg
- 1/3 cup plain breadcrumbs (panko or regular)
- 1 tablespoon yellow mustard
- 2 tablespoons ketchup
- 1 tablespoon Worcestershire sauce
- 1 teaspoon kosher salt
- 1/2 teaspoon black pepper
- 1/2 teaspoon garlic powder
- 1/2 teaspoon onion powder
- 1/4 teaspoon smoked paprika (optional, for a subtle smoky note)
- 2 tablespoons mayonnaise (for brushing, optional)
- Neutral oil spray for the pan
Instructions

- Preheat your oven to 400°F (200°C).
Line a baking sheet with parchment or foil and lightly spray with oil. This helps the bites crisp and release easily.
- Cook the bacon until crisp. Drain on paper towels and chop it finely.
Set aside. You want small pieces so they mix evenly and don’t cause the bites to fall apart.
- In a large bowl, combine the ground beef, chopped bacon, shredded cheese, diced onion, relish, egg, and breadcrumbs.
- Add the mustard, ketchup, Worcestershire sauce, salt, pepper, garlic powder, onion powder, and smoked paprika. Mix gently with your hands or a fork.
Don’t overwork it—just until everything is evenly combined.
- Use a tablespoon or small scoop to portion the mixture into bite-sized balls, about 1 to 1.5 inches in diameter. You should get roughly 24 bites.
- Arrange the bites on the prepared baking sheet with a little space between each. If you like extra browning, lightly brush or dab the tops with a thin layer of mayonnaise.
- Bake for 12–15 minutes, or until the centers reach 160°F (71°C) and the edges are nicely browned.
If you want more color, broil for 1–2 minutes at the end.
- Let them rest for 3–4 minutes. This helps the juices settle and the cheese set slightly.
- Serve warm with your favorite toppings and dips. Good options include a quick “special sauce” (equal parts mayo and ketchup with a splash of pickle juice), mustard, BBQ sauce, or ranch.
Keeping It Fresh
- Make-ahead: Form the bites up to 24 hours in advance.
Cover and refrigerate. Bake just before serving.
- Storing leftovers: Keep cooked bites in an airtight container in the fridge for up to 4 days. Reheat at 350°F (175°C) for 8–10 minutes so they crisp up again.
- Freezing: Freeze uncooked, formed bites on a sheet pan until solid, then transfer to a freezer bag for up to 3 months.
Bake from frozen at 400°F (200°C) for 18–20 minutes.
- Transport tips: If taking to a party, line a warm slow cooker or insulated carrier with parchment and hold on “warm.” Keep sauces on the side.
Why This is Good for You
- Protein-packed: Each bite delivers satisfying protein, which helps with fullness and steady energy.
- Customizable fats: Using 80/20 beef keeps them juicy, but you can swap in leaner beef or turkey if you prefer.
- Built-in portion control: Small bites make it easier to serve a crowd and pace your snacking.
- Room for veggies: Serve with crunchy lettuce cups, cherry tomatoes, or cucumber slices for balance and freshness.
What Not to Do
- Don’t overmix the meat: Overworking leads to dense, tough bites. Mix just until combined.
- Don’t skip the binder: The egg and breadcrumbs help hold everything together. Leaving them out can cause crumbling.
- Don’t overcrowd the pan: Crowding traps steam and prevents browning.
Use two pans if needed.
- Don’t underseason: These are small, so seasoning matters. Taste a tiny test patty if you’re unsure.
- Don’t forget a dip: A simple sauce adds moisture and that classic cheeseburger vibe.
Variations You Can Try
- Spicy Jalapeño Bites: Add 1–2 tablespoons minced jalapeño and a pinch of cayenne. Top with pepper jack instead of cheddar.
- BBQ Bacon Bites: Swap ketchup for BBQ sauce, add a little smoked paprika, and serve with extra sauce for dipping.
- Turkey Cheeseburger Bites: Use ground turkey (93/7).
Add an extra tablespoon of oil or mayo to keep them moist.
- Gluten-Free: Use gluten-free breadcrumbs or crushed gluten-free crackers. Double-check your sauces for hidden gluten.
- Pickle Lovers: Increase relish to 3 tablespoons and add a teaspoon of pickle juice to the mix.
- Mini “Slider” Style: Press the mixture into mini muffin tins and top with a square of cheese at the end of baking. Add a pickle slice before serving.
- Breakfast Twist: Swap cheddar for Swiss, add a pinch of dried thyme, and serve with a drizzle of maple-mustard.
FAQ
Can I make these in an air fryer?
Yes.
Preheat the air fryer to 375°F (190°C). Arrange the bites in a single layer and cook for 8–10 minutes, shaking the basket once, until browned and cooked through. Work in batches to avoid overcrowding.
How do I keep them from falling apart?
Use the egg and breadcrumbs as written, and chop add-ins finely.
Mix gently and pack each bite just enough to hold its shape. Chilling formed bites for 15 minutes before baking also helps.
What cheese works best?
Cheddar is classic, but Colby Jack, pepper jack, or American cheese all melt beautifully. Shred your own if you can—it melts smoother than pre-shredded.
Can I skip the bacon?
You can.
The bites will still be tasty, but you’ll miss some smoky depth. Consider adding a pinch of smoked paprika or a dash of liquid smoke to make up the flavor.
What sauces go well with these?
Special sauce (mayo, ketchup, pickle juice), honey mustard, BBQ sauce, ranch, chipotle mayo, or a simple garlic aioli are all great. Offer two or three so guests can choose.
How do I tell when they’re done?
Use an instant-read thermometer and look for 160°F (71°C) in the center.
The exterior should be browned, and the cheese will be melty and bubbling in spots.
Can I add vegetables to the mix?
Absolutely. Finely diced bell pepper or grated zucchini works well. Squeeze excess moisture from zucchini and keep the pieces small so the bites hold together.
Wrapping Up
Loaded Bacon Cheeseburger Bites give you everything you love about a backyard burger in a crisp, juicy, shareable package.
They’re easy to prep, quick to bake, and endlessly customizable. Keep a batch in the freezer for last-minute guests or a fun weeknight dinner. Serve them hot with a few sauces and watch them vanish.
Simple, satisfying, and always a hit—these bites earn a spot in your regular rotation.
Printable Recipe Card
Want just the essential recipe details without scrolling through the article? Get our printable recipe card with just the ingredients and instructions.